Controll an led over the internet.(IOT)Internert of things

CONTROL AN LED'S USING NODEMCU AND THINGSPEAK.
There are some steps to make this project:
- Make an account on https://thingspeak.com/.
- create channel on thingspeak.
- Fullfill the code required credentials.
- upload the code to Nodemcu Esp8266 Development Board
.
Materials required for this project:
- Nodemcu Esp8266 Development Board
.
- 5 mm LEDs (White, Green, Red, Yellow and Blue)
Any of these.
- Jumper Wires Male to Male.
- Bread Board.
- Laptop for uploading the code to Nodemcu.


Make an account on https://thingspeak.com/.
- Go to Google.com and Search for https://thingspeak.com/.
- Click on Get Started For Free.

- Enter your Email ID.

- Enter your password.


- Click on New Channel.
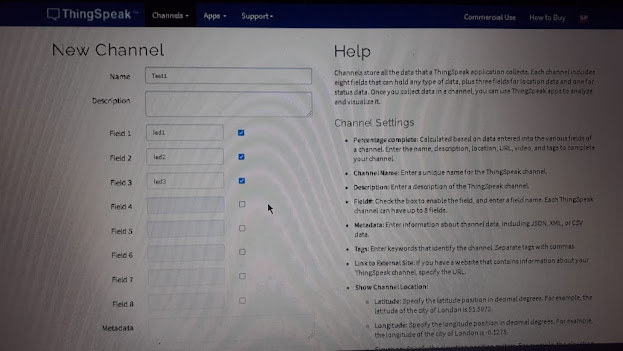
- Finally click on save Channel.

- Click on sharing option as shown in the image. To set the privecy.


Fine you are all set to og for the coding part.
Upload the code to Nodemcu Esp8266 Development Board.
//Welcome to Smarthub100---SUBSCRIBE Now
#include "ThingSpeak.h"
#include <ESP8266WiFi.h>
//Replace your wifi credentials here
const char* ssid = "Sohail";//Replace with your Wifi Name
const char* password = "11110000";// Replace with your wifi Password
//change your channel number here
unsigned long channel =1138780;//Replace with your own ThingSpeak Account Channle ID
//1,2 and 3 are channel fields. You don't need to change if you are following this tutorial. However, you can modify it according to your application
unsigned int led1 = 1;
unsigned int led2 = 2;
unsigned int led3 = 3;
WiFiClient client;
void setup() {
Serial.begin(115200);
delay(100);
pinMode(D1, OUTPUT);
pinMode(D2, OUTPUT);
pinMode(D3, OUTPUT);
digitalWrite(D1, 0);
digitalWrite(D2, 0);
digitalWrite(D3, 0);
// We start by connecting to a WiFi network
Serial.println();
Serial.println();
Serial.print("Connecting to ");
Serial.println(ssid);
WiFi.begin(ssid, password);
while (WiFi.status() != WL_CONNECTED) {
delay(500);
Serial.print(".");
}
Serial.println("");
Serial.println("WiFi connected");
Serial.println("IP address: ");
Serial.println(WiFi.localIP());
Serial.print("Netmask: ");
Serial.println(WiFi.subnetMask());
Serial.print("Gateway: ");
Serial.println(WiFi.gatewayIP());
ThingSpeak.begin(client);
}
void loop() {
//get the last data of the fields
int led_1 = ThingSpeak.readFloatField(channel, led1);
int led_2 = ThingSpeak.readFloatField(channel, led2);
int led_3 = ThingSpeak.readFloatField(channel, led3);
if(led_1 == 1){
digitalWrite(D1, 1);
Serial.println("D1 is On..!");
}
else if(led_1 == 0){
digitalWrite(D1, 0);
Serial.println("D1 is Off..!");
}
if(led_2 == 1){
digitalWrite(D2, 1);
Serial.println("D2 is On..!");
}
else if(led_2 == 0){
digitalWrite(D2, 0);
Serial.println("D2 is Off..!");
}
if(led_3 == 1){
digitalWrite(D3, 1);
Serial.println("D3 is On..!");
}
else if(led_3 == 0){
digitalWrite(D3, 0);
Serial.println("D3 is Off..!");
}
Serial.println(led_1);
Serial.println(led_2);
Serial.println(led_3);
delay(3000);
}
- Go to API Key and copy the link and paste it in the search bar and search.


Comments
Post a Comment